 Help Center
Payscore is directly integrated within Rent Manager’s marketplace and can be easily enabled for your on-site teams.
Setting Up a Rent Manager Integration
Before using Payscore within Rent Manager, a Rent Manager admin will need to enable the integration from their side.
-
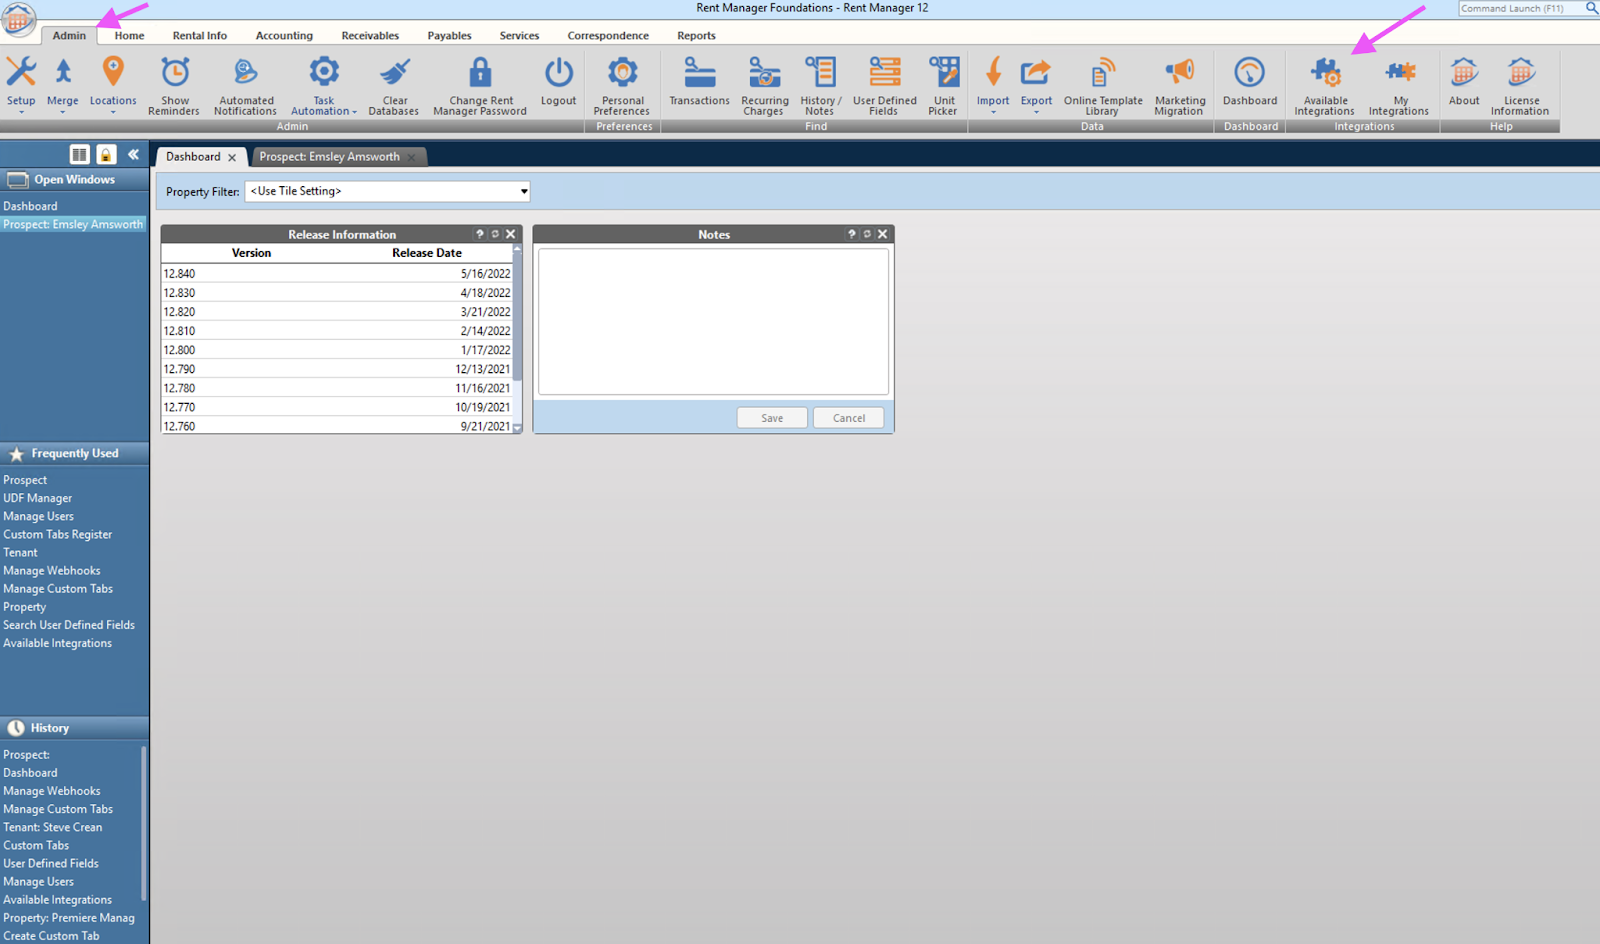
Open Rent Manager, go to the Admin tab, and then click Available Integrations on the top right
-
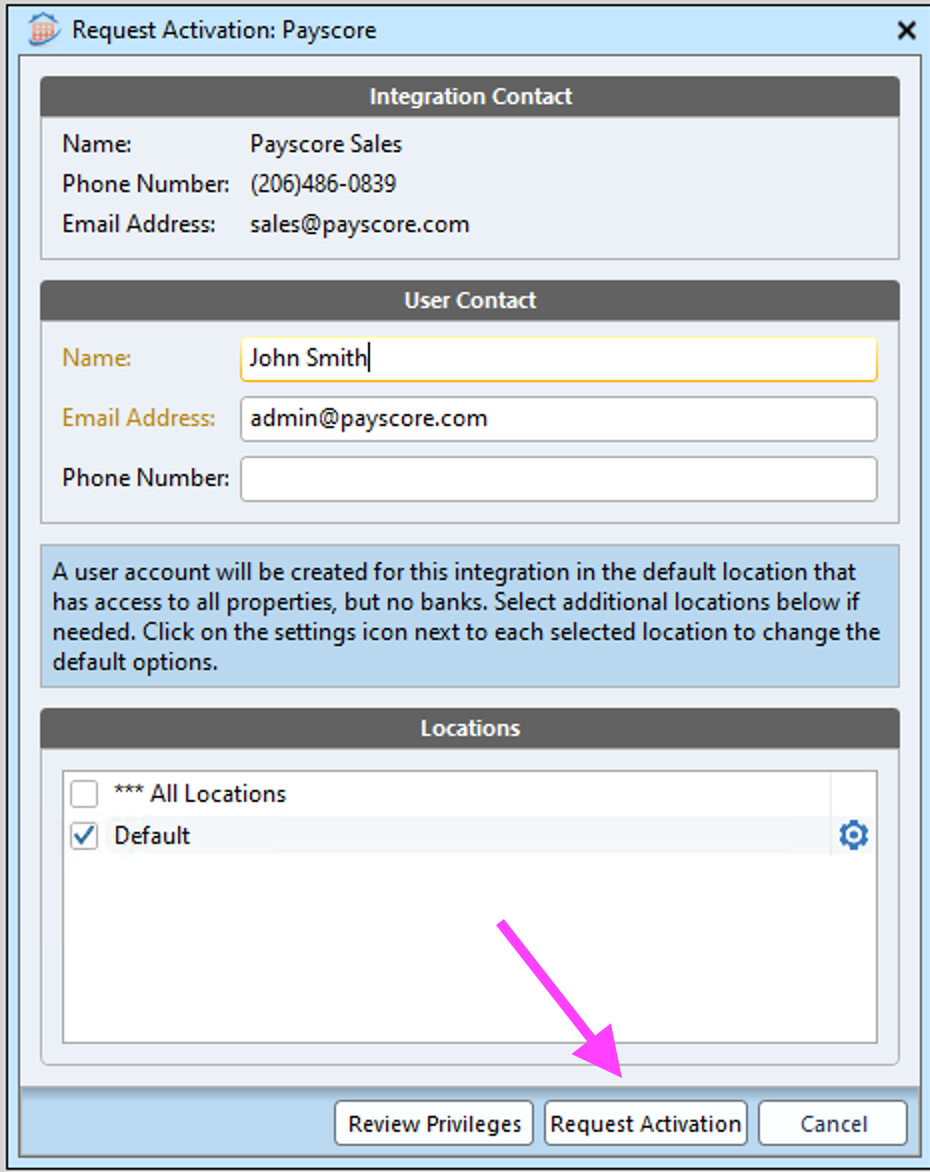
Search for Payscore and click Request Activation
-
Enable all the locations that want to have the integration enabled and then click Request Activation
-
Payscore has now been sent a request to activate your integration. Please reach out to your Payscore representative to let them know that these steps have been completed.

Installing the Prospect Tab
Once the integration has been activated from Payscore’s side, you will now need to install the Prospect tab in order for your operators to send invites to your applicants directly from applicants. In order to do that, please have a Rent Manager admin follow the instructions below.
- Install the custom tab
- Go to the Admin tab, click Setup, and then go to Custom Tabs, and then Custom Tab Register
- On the next screen, on the bottom right hand corner, click the arrow next to Import and then click the Online Template Library
- Double click the folder Prospect Tabs
- Choose the Automated Income Verification template, and then click the download button on the right-hand side. Accept the disclaimer and the template should be imported successfully. If they are asked to map and user defined fields, do not do anything and just click Next.

- Go to the Admin tab, click Setup, and then go to Custom Tabs, and then Custom Tab Register
- Assign the custom tab to all users
- Finally, the custom tab needs to be assigned to the users or groups that want to use the automated income verification product. Go to the Admin tab, click Setup, and then go to Custom Tabs, then Manage Custom Tabs.
- On the next screen, change the form type to Prospect
- Next, choose the user that you'd like to enable the custom tab for on the left hand side, click the form Automated Income Verification, and then click the right arrow to move the custom tab to the Selected Forms window.
- Hit Save, and then do this for all the users you wish to add Automated Income Verification for. This needs to be done manually, due to Rent Manager limitations.
- Finally, the custom tab needs to be assigned to the users or groups that want to use the automated income verification product. Go to the Admin tab, click Setup, and then go to Custom Tabs, then Manage Custom Tabs.
- Once all these steps are completed, you will be able to see and use the Automated Income Verification tab in the Prospects module!
Installing the Tenant Tab
-
- In order for a customer to use our integration, they need to install our custom tab. This needs to be done by a user with admin-level permissions. Go to the Admin tab, click Setup, and then go to Custom Tabs, and then Custom Tab Register
- On the next screen, on the bottom right hand corner, click the arrow next to Import and then click the Online Template Library
- Double click the folder Tenant Tabs
- Choose the Automated Income Verification template, and then click the download button on the right-hand side. Accept the disclaimer and the template should be imported successfully. If they are asked to map and user defined fields, do not do anything and just click Next.
- In order for a customer to use our integration, they need to install our custom tab. This needs to be done by a user with admin-level permissions. Go to the Admin tab, click Setup, and then go to Custom Tabs, and then Custom Tab Register
-
- Finally, the custom tab needs to be assigned to the users or groups that want to use the automated income verification product. Go to the Admin tab, click Setup, and then go to Custom Tabs, then Manage Custom Tabs.
- On the next screen, change the form type to Tenant
- Next, choose the user that you'd like to enable the custom tab for on the left hand side, click the form Automated Income Verification, and then click the right arrow to move the custom tab to the Selected Forms window.
- Hit Save, and then do this for all the users you wish to add Automated Income Verification for. This needs to be done manually, due to Rent Manager limitations.
- Finally, the custom tab needs to be assigned to the users or groups that want to use the automated income verification product. Go to the Admin tab, click Setup, and then go to Custom Tabs, then Manage Custom Tabs.